Peanut Butter Cauliflower Bowl with Roasted Carrots

Comment

Peanut Butter Cauliflower Bowl with Roasted Carrots

Prep Time 10 mins ~ Cook Time 30 mins ~ Total Time 40 mins

unnamed.jpg

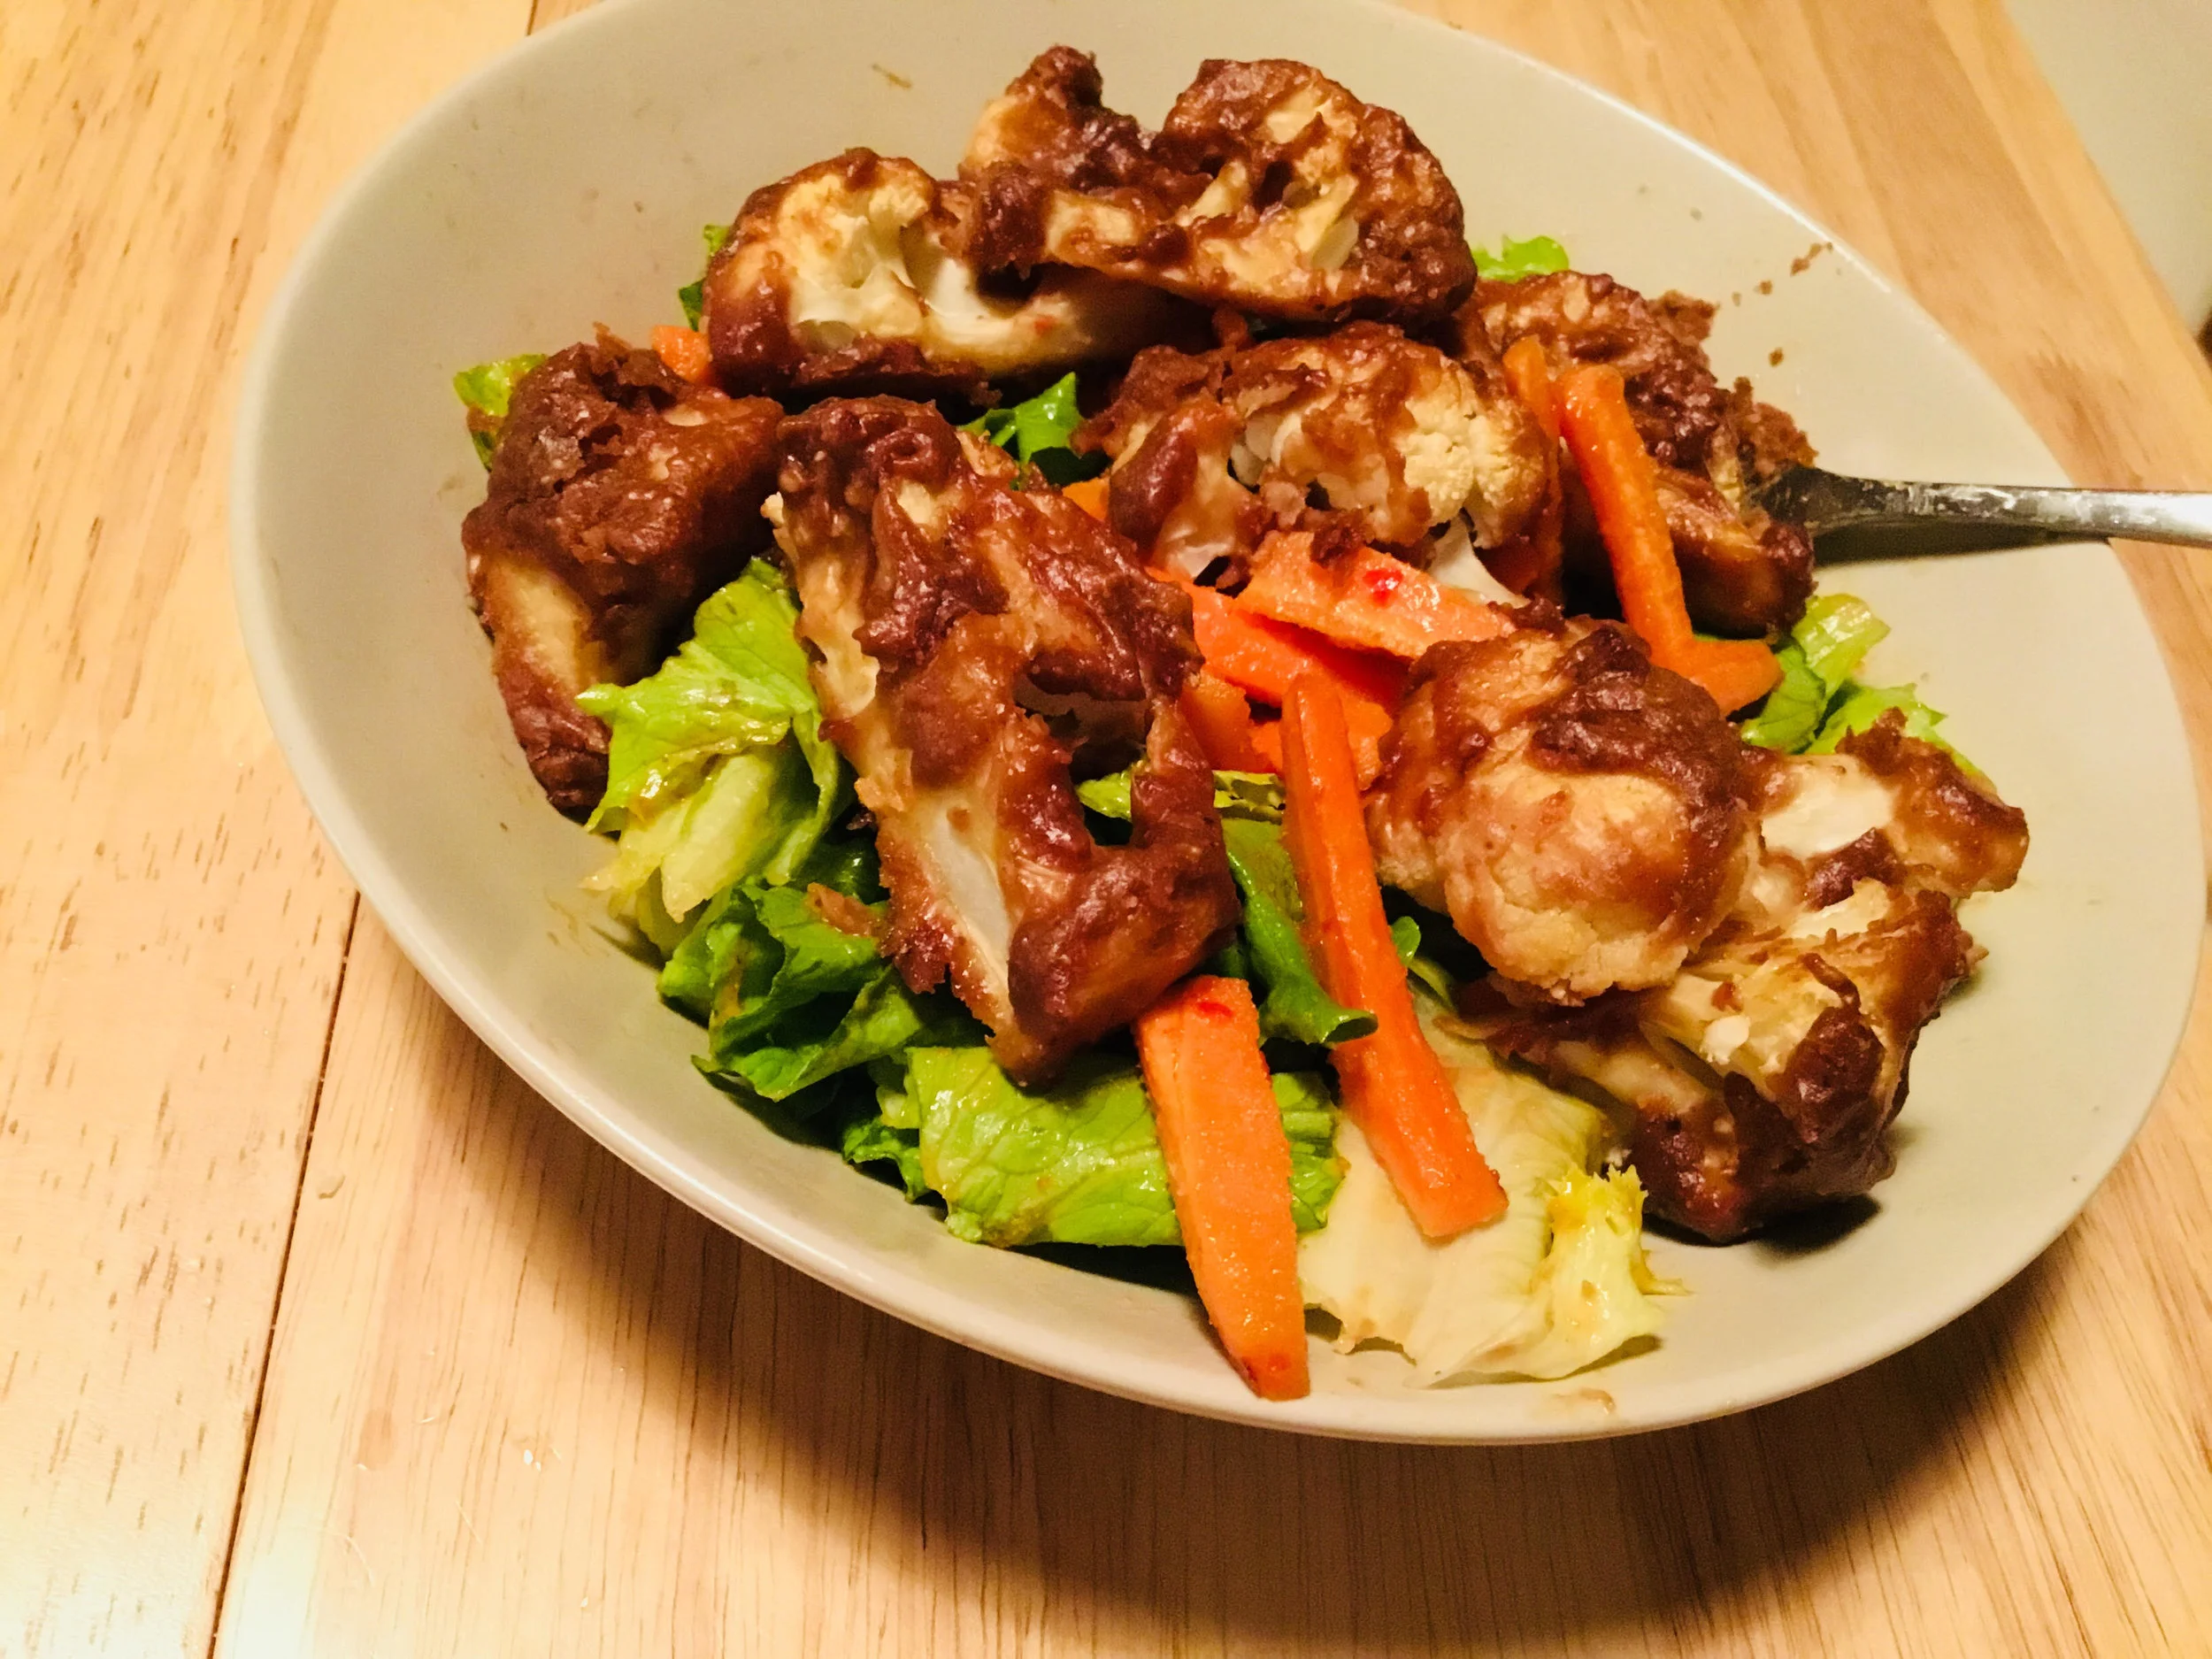
Peanut Butter Cauliflower Bowl with Roasted Carrots. Cauliflower tossed in peanut butter sauce and roasted, carrots tossed in hot sauce and roasted. Vegan Recipe, Gluten-free option.  

Course: Main Course   Cuisine: Gluten-free, Vegan   Servings: 4   Calories: 306 kcal Ingredients       

For the Peanut Sauce:

  • 1/2 cup peanut butter , use sunbutter to make it nutfree
  • 1.5 tbsp lime juice
  • 1.5 tbsp soy sauce , use tamari to make gluten-free
  • 2 tbsp maple or sugar
  • 1 tsp vinegar
  • 2 tsp  hot sauce or sriracha or sambal oelek , to taste
  • 1 inch ginger
  • 1 clove of garlic
  • 1/4 cup water
  • 1 tsp sesame oil
  • generous pinches of salt and black pepper , and 1/4 tsp pepper flakes (optional)
  • 1 to 3 tbsp flour , use rice flour for gluten-free
  • 1 small or half a head medium cauliflower chopped into small florets

For the Carrots:

  • 2 tsp sesame oil
  • 1 tsp hot sauce or sriracha
  • 1/2 tsp garlic powder
  • a pinch of salt
  • 4 or 5 carrots sliced

Bowl:

  • Greens, lettuce, or kale
  • crunchy veggies like peppers, cabbage 

Instructions

  1. Preheat oven to 425 degrees F. Line a large baking sheet with parchment.

  2. Blend everything under peanut sauce. Taste and adjust flavor. Keep a quarter of the sauce for drizzling, transfer the rest to a large bowl. Add flour to the bowl to thicken the sauce so that it sticks to the veggies during baking.

  3. Take cauliflower florets one at a time, dip in peanut sauce and place floret on the lined baking sheet. Tap to remove excess sauce before placing. Some sauce might be left in the bowl, use as dressing later.

  4. Toss carrots with the ingredients under carrots and mix in. Spread on the sheet.

  5. Bake for 15 minutes, then reduce temperature to 400 degrees F and bake for another 10 to 15 minutes or until cauliflower is tender

  6. Prepare the bowls with lettuce or greens of choice. Add some bell pepper and apple or pear. Add the cauliflower and carrots, dress generously with the peanut butter sauce, some pepper flakes and scallions or basil. Serve with cooked grains like quinoa/rice, or spiced chickpeas for a hearty meal. 

Recipe Notes

Variations: Add some pressed tofu, broccoli or tempeh to the sauce and bake with the cauliflower

Comment

High Protein Vegan Breakfast Burrito

Comment

High Protein Vegan Breakfast Burrito

vegn burritos.jpg

I wanted to try this amazing recipe from Oh She Glows, mainly because I wanted to see if pressing tofu really made a difference. I think it did, and it wasn't that hard. I simply wrapped the tofu in a clean tea towel, pressed it down with a large can of chickpeas and let the water evaporate for 20min to an hour.

Yield Four 3/4 cup servings     
Prep time 20 Minutes
Cook time 20 Minutes

Ingredients:

  • 1 package extra-firm tofu, rinsed and pressed
  • 1 tsp extra virgin olive oil
  • 3 garlic cloves
  • 2 cups diced onion (about 1 medium)
  • 1 cup diced potato (~115 grams or half a medium potato)
  • 1.5 cups sliced mushrooms (I used portabello)
  • 1/4 cup nutritional yeast
  • 3-4 tbsp minced basil
  • 2 tbsp minced parsley
  • 1-1.5 tbsp fresh lemon juice
  • 3/4 tsp sea salt  + black pepper
  • For garnish: chopped salsa, avocado (or guacamole) green onion

Directions:

  1. Press tofu: Rinse the tofu with water. Wrap the tofu in tea towel and press a can into the wrapped tofu. Let sit for at least 20 min to 2hrs to soak out the water. 
  2. When you're ready heat a large skillet with 1 tsp oil over medium heat. Sauté garlic, onion and then add diced potato and stir. Finally add mushrooms and sauté for 15 minutes, reducing heat if necessary and stirring frequently so it doesn’t stick to the bottom.
  3. Remove tofu from towel. It becomes quite crumbly, making it the perfect texture and size.
  4. Reduce heat to low and stir in the nutritional yeast, crumbled tofu, fresh herbs, lemon juice, and season with salt and pepper to taste. Continue cooking on low until potato is cooked through.
  5. Serve tofu mix with warmed tortillas with bowls of salsa, guacamole, green onions, and whichever condiments you like. and let everyone make their own customized breakfast burrito!

Comment

Green & Clean: Options to Help You Breathe Easier

Comment

Green & Clean: Options to Help You Breathe Easier

Is winter over yet? Like many Montrealers, I’m ready to breathe again. I packed up my winter clothes and I opened my windows that have been shut for months, closed my eyes and inhaled deeply. I opened my eyes and as my lungs filled with fresh air, I looked around and all I could see was how dirty everything looked. 

Spring brings a need to clean. Every year at this time, we like to start with a clean slate. Detoxes in mind and body are underway and we start thinking about spring cleaning but before you reach for that commercial cleaning product under your sink, lets talk about options.  I’m not a big fan of using things that have labels with skull and cross bones on them.  The amount of toxins in commercial cleaning products is staggering, they’re expensive, and are almost always packaged in plastic.  There has been no better time to go green. 

Being the founder of Audre Leigh Beauty, I obviously believe in the power of plants, so naturally, I clean my living spaces with essential oils.  With their antibacterial, anti-fungal and antiviral properties, they don’t damage my health or the health of my loved ones, they don’t damage the environment and they most often work much better than the mass marketed cleaning products you can find at your grocery store chain. And did I mention the aromatherapeutic benefits? 

The most common essential oils to use is the brilliant Lavender — the most essential of the essential oils — strong, yet gentle, there is little it can’t do. It can sanitize floors, countertops and my fella loves it when I spray lavender floral water on our sheets, making slipping into bed even more divine after a long day.  

Not a fan of lavender? Neither am I. The great thing about essential oils is there are so many scents to choose from. If you prefer herbal scents, try peppermint, tea tree,thyme, eucalyptus, lavender. And if you prefer spicy scents, there’s cinnamon and clove and the citrus scents, like lemongrass and orange are always favourites.

Once you choose your scents, here’s a great basic recipe that can be used for everything from cleaning floors to countertops:

Makes about 20 ounces

  • 15 ounces distilled water
  • 5 ounces white distilled vinegar
  • 1/4 cup lemongrass essential oil
  • 1 tbs clove essential oil
  • 1 tsp peppermint essential oil

No time to make your own cleaning products? Montreal has a growing list of retail stores that offer eco-friendly cleaning materials and some like, Klova on St Denis offer refills, so you can bring in bottles and refill them, limiting the amount of waste, while supporting our local businesses.

This season is a great time to try new things. Inhale deeper than you have ever before this spring with greener air and cleaner habits that won’t only benefit you, but the world around you. Breathe easier. Essentially, the time is now. 

Comment

Easy Soba Noodle Salad from Oh She Glows

Comment

Easy Soba Noodle Salad from Oh She Glows

IMG_0022.JPG

This is one of our favorite family recipes. It's quick and easy to prepare, and the kids love it! Both my boys like raw veggies, pasta and tofu, so it's the perfect recipe. I usually serve it with a spring roll on the side. If I don't have all the veggies on hand, I just swap them out and add cucumbers, edamame beans, etc...

http://www.loveleone.com/easy-soba-noodle-salad-oh-she-glows/

Dressing:

  • 1/4 cup toasted or untoasted sesame oil
  • 3-4 tablespoons rice vinegar to taste (if you like it tangier add 4)
  • 1 tablespoon plus 2 teaspoons tahini
  • 1 tablespoon low sodium tamari
  • 2 cloves garlic, grated
Soba Noodle Salad

For the Salad:

  • 1 (8-ounce) package of soba noodles
  • 1 medium red bell pepper, seeded and diced (about 1 1/4 cups)
  • 3-4 green onions, finely chopped (about 3/4 cups) – If I’m being honest I cut these out – I hate green onions
  • 1 cup loosely packed cilantro leaves, minced
  • 1 batch Cast-Iron Tofu (see below)
  • Fine Sea Salt
  • 1 tablespoon sesame seeds to garnish
  • Fresh lime juice for serving
  • Sriracha, for serving

Cast Iron Tofu:

  • 1 (12-16 oz) block of firm or extra firm tofu
  • 3 teaspoons avocado oil, grapeseed oil or olive oil
  • 1 teaspoon garlic powder
  • 1/4 teaspoon fine sea salt
  • 1/4 teaspoon onion powder (optional)

1) Prepare the Cast Iron Tofu:

  1. Press the Tofu – I used the “Book Stacking Method” with my heavy coffee table books! Rinse the tofu with water, lay two thick dish towels on top of each other on the counter and place a few sheets of paper towel on top. Slice the tofu into 9-10 rectangles and set them on the paper towel in a single layer. Place 2 or more thick dishcloths on top of the tofu slabs and place a cutting board on top of those dishcloths. Set several heavy books on top of the cutting board. Let sit for 20-30 minutes OR over night to allow for the weight of the books to press out the water. I waited about 1 hour and the tofu turned out perfect.
  2. Slice the pressed tofu into squares, roughly giving you 54-60 tofu pieces.
  3. Heat a large skillet (non-stick) over medium heat for several minutes (When a drop of water gently sizzles on the skillet, the skillet is hot enough to add the tofu).
  4. In a large bowl, combine the tofu with 1 1/2 teaspoons of the oil. Stir until the tofu is coated. Stir in the garlic powder, salt and onion powder.
  5. Carefully add the remains 1 1/2 teaspoons oil to the pan (when hot enough) and tilt the skillet to coat it evenly. Add the tofu to the pan in a SINGLE layer to make sure all pieces lay flat.
  6. Cook the tofu on one side for 4-7 minutes until you have a golden crust. Then, with a fork, flip EACH piece and cook the other side for 4-5 minutes until golden. If you want to enjoy the crispy crust of the tofu, serve immediately. It is still delicious when it softens!

2) Make the dressing – in a small bowl, whisk together the dressing ingredients until smooth (I threw it in my bullet to really mix it up) – cover, store in the fridge to thicken

3) Make the Salad – cook the noodles, drain, place in a large bowl

4) Add the bell peppers, green onions (eww), and cilantro to the bowl with the noodles. Add the dressing and toss to coat. Add half the tofu cubes and toss again, taste and season if necessary.

5) Top the salad with remaining tofu, sesame seeds and cilantro scattered on top. Squeeze a bit of lime juice. Salad can be stored in fridge for up to 3 days, is delicious hot or cold – but if you want to enjoy your tofu crispy then gobble it down while it’s hot! 

- Jennifer Maagendans

Comment

Zucchini Bread Muffin Tops from the Oh She Glows App

Comment

Zucchini Bread Muffin Tops from the Oh She Glows App

Zucchini Bread Muffin Tops from the Oh She Glows app

Oh She Glows app image

When I found out that the Oh She Glows app was on sale for just $0.99 I decided to try it out! It's super fun and easy to use! It has a long scrolling list of recipes you can browse, a search function so you can find a specific recipe, separate sections for Description (Headnote), Ingredients, Directions and Tips for each recipe and even a section where you can add your own personal notes. You can also mark your favourite recipes and find them more quickly, click off the ingredients and the steps as you go so you don't forget where you are along the list and the app stays open (your phone doesn't shut off automatically) so that you don't have to constantly unlock your phone (probably with sticky  hands!).

When I came across this Zucchini Bread Muffin Top recipe, I thought it looked pretty simple and didn't require a super long list of ingredients, plus it's gluten-free, nut-free, soy-free, refined sugar-free and (of course) vegan! Sounded like an all-around win to me! And I got a lot of positive comments from the students when I offered them up after class as part of our Spring Challenge. :-)

MAKES: 14-16 muffin tops
PREP TIME: 15 minutes
COOK TIME: 20 minutes


Ingredients:

Zucchini Bread Muffin Tops ingredients
  • 1 1/2 cups (170 g) lightly packed grated zucchini
  • 1 cup (225 g) packed pitted Medjool dates
  • 3/4 cup (180 mL) unsweetened applesauce
  • 1/4 cup (60 mL) virgin coconut oil, melted
  • 1 teaspoon cinnamon
  • 1 teaspoon baking powder
  • 1 teaspoon (5 mL) pure vanilla extract
  • 1/4 teaspoon plus 1/8 teaspoon fine sea salt, or to taste
  • 2 cups (200 g) gluten-free rolled oats, divided
  • 1/2 cup (50 g) dark chocolate or walnuts, chopped (optional)

Directions:

  1. Preheat oven to 350 degrees F (180 degrees C) and line a large baking sheet with parchment paper.
  2. Grate the zucchini. With paper towel or an absorbent tea towel, gently press out some of the water in the zucchini (just a bit... it doesn't have to be bone dry). Set aside.
  3. Add the pitted dates, applesauce, melted oil, cinnamon, baking powder, vanilla, and salt into a heavy-duty food processor. Process until smooth, stopping to scrape down the bowl as needed. Let the processor run for at least a minute to ensure the mixture gets as smooth as possible.
  4. Add 1 1/2 cups of rolled oats and process for only 4 to 5 seconds, just long enough to roughly chop the oats.
  5. Remove the processor bowl from the base, remove the blade, and spoon the dough into a large bowl. Stir in the remaining 1/2 cup rolled oats, all the zucchini, and the chocolate or walnuts (if using) until thoroughly combined.
  6. Spoon a mound of dough, about 2 to 3 tablespoons worth, onto the baking sheet. (My favourite trick is to use an ice cream scoop, to ensure that each comes out about the same size) Do not press down on the dough to flatten -- simply leave it in a small mound. Repeat until all the dough is used up.
  7. Bake the muffin tops for around 18 to 22 minutes, until semi-firm to the touch and golden brown on the bottom.
  8. Transfer the baking sheet onto a cooling rack for 10 minutes.
  9. Using a spatula, carefully slide each muffin top directly onto a plate and chill in the fridge until completely cool. (The muffin tops will be delicate and doughy in the middle until they are cooled and chilled in the fridge. I find they taste best chilled, too!) Leftovers will keep in an airtight container in the fridge for 4 to 5 days, or you can freeze them (tightly wrapped and sealed in an airtight container) for 2 to 4 weeks.

- Frances Vicente

Comment

Happiness is skin deep

Comment

Happiness is skin deep

I have come to accept my skin. It’s thin, easily offended and without fail, reminds me when I haven’t been getting enough sleep. Since my skin and I are stuck with each other, I have come to understand it, and know what makes it happy. When my skin is happy, I find myself in a good place.

So let’s talk about happy skin. The harsh truth is that we live in an environment that often works hard to make our skin downright unhappy.  Pollution, sun damage, and stress all wreak havoc on the well-being of our skin.  A good diet is essential, but great skincare is key. I have found that a clean beauty attitude is as integral to the health of our skin as a clean diet can be.

The first time I was introduced to the power of plant oils, I was awestruck with the experience. I was hopeful, but never expected my skin to respond so immediately. But like a garden after a good rainfall, my skin blossomed and I have not looked back.

Plant oils can be complex, and have unique characteristics to them, such as comedogenic properties — meaning how likely they are to clog our pores. They can also be categorized as either ‘dry’ or ‘wet’ oils, referring to how quickly they absorb into the skin. Face oils and serums, such as the ones we create at Audre Leigh, are designed based on the unique active qualities each oil brings to the skin. Our basic kitchen staples, like coconut and olive oil, which are skin-friendly and great for many skincare uses, are not always tolerated by many skin types, so before you slather on that organic olive oil you have in your cupboard, let’s talk a little about skin-friendly oils! 

Plant oils come from a long list of fruit, flower, vegetable and grain seeds — cold-pressed is best, as is organic. Precious flower seed oils, such as Rosehip and Camellia (green tea) have a low chance of clogging pores, and are considered great skin regenerators — suitable for acne sufferers and well-tolerated by most.  Argan, Borage and Jojoba are seen as the ‘holy grail’ of oils with their abilities to repair, moisturize and tone our skin.

Plant oils are chock full of vitamins and fatty acids, with omega 3, 6 and 9 being of particular interest, as they help heal and build strength in our skin cells. We often hear of antioxidant-rich foods, and the same can be applied to skincare. Think of face oils as a protective barrier to the pollution in our environment — from car exhaust, smoke, stress and sun damage, which all compromise the overall health of our skin. Keeping our skin happy isn’t always easy, and we are seeing a societal shift in focus on self-care as a result, with a renewed interest in ancient beauty rituals making a comeback. Ayurvedic beauty practices are also coming back into vogue, with the resurgence of such practices as Mukepaleham, where precious oils are deeply massaged into the skin allowing for the time needed to connect and build a relationship with our beauty regimen. On the flip side, commercial lotions filled with silicones, fragrances and preservatives — that have no skin benefits — are being called into question for weakening and deteriorating our facial skin cells over time. By contrast, clean and green beauty products are potent, plant-based, and cruelty-free, offering an alternative to traditional commercial based beauty products. 

Ditching the age-old visions of beauty as ‘anti-aging’ while distancing ourselves from the days of botox and beauty-at-any-cost, we are seeing a cultural shift that embraces a balanced and age-positive outlook of what beauty is, and can be. Healthy skin has never been more relevant. And when we are healthy, happiness usually isn’t far behind.

When I was designing Audre Leigh’s Beauty Seed Oil, I wanted to develop a serum that would incorporate all the natural, plant-based qualities powerful enough to make my skin sing. To this day, my skin still feels like a wonderful, ongoing operetta.  I believe in the power of plants, and the potency they offer. The ritual of massaging, touching and connecting with my skin and seeing the difference it makes is, for me, an act of self-care with unmistakable results and the first step towards actualizing my own happiness —  a happiness I love seeing in my face.

- Shannon Cleary

Comment

Colourful Eating for Spring

Comment

Colourful Eating for Spring

Colourful Eating for Spring

blog image from www.happyhealthycouple.com

Spring can be a fresh start for your nutrition. With a little more blue in the sky and green on the ground, it's a good time to think about your nutrition in terms of colours as well. The vitamins and minerals that are found in plants are visible through their colours, so start thinking about your plate as a rainbow. A good rule of thumb is to include at least 2 colours on every plate so that over the day you eat from all of the various groups. There are seven key colours for plant-based foods, each of which provides different key elements for health. 

Blue/Purple

The darker the blue hue, the higher the phytochemical concentration. Anthocyanins are antioxidants that are particularly heart healthy and may help support healthy blood pressure. They may also help lower risk of cancer.

Examples: Eggplant (especially the skin), blueberries, blackberries, prunes, plums, pomegranates

Green

The natural plant pigment chlorophyll colors green fruits and vegetables.

Green vegetables are excellent sources of vitamin K, folic acid, potassium, as well as carotenoids and omega-3 fatty acids. Folic acid is needed to prevent neural tube defects during pregnancy, and vitamin K is essential in blood clot formation. Diets high in potassium are associated with lowering blood pressure, and there is an inverse relationship between cruciferous vegetables and cancer, especially colon and bladder cancers.

Yellow/Green

These foods are high in lutein, beneficial for eye health, and vitamin C, a powerful antioxidant. One surprise example is a pistachio, due to it's green-hued skin. 

Red

Lycopene is the predominant pigment in reddish fruits and veggies. It is a powerful antioxidant that has been associated with a reduced risk of some cancers, especially prostate cancer, and protection against heart attacks. Folate and vitamin C are also found here. 

Yellow/Orange & Orange

Beta-cryptoxanthin, beta-carotene, and alpha-carotene are all orange-friendly carotenoids and can be converted in the body to vitamin A, a nutrient integral for vision and immune function, as well as skin and bone health. In addition, they may have high levels of vitamin C, and some contain omega-3 fatty acids. They may also reduce the risk of heart disease and improve immune function,” she says.

White/Beige

Flavonoids are for the most part colourless. These are powerful antioxidants, and help the body to counteract free-radical formation. When free-radical damage goes unchecked, it can cause significant damage to body cells and tissues.  

Take-away message:

The benefits of eating produce are not dependent on eating raw foods. In fact, cooking enhances the activity of some phytochemicals, such as lycopene. Obtaining optimal benefit from the nutrients in food, especially produce, depends on proper selection, storage, and cooking of the produce. So enjoy a full rainbow of plant-based foods, and don't worry so much about their combinations or preparation methods. Find recipes you love to carry you through the seasons and benefit from the wellness this can bring. 

Eat your colours.png

To find out about Vegan Nutrition and ask Andrea any of your nutrition related questions, come to her Vegan Nutrition workshop Monday, April 30th from 7:30-8:30pm.

Comment

Vegan Chocolate Toffee Crunch

Comment

Vegan Chocolate Toffee Crunch

Vegan Chocolate Toffee Crunch

Ingredients

  • 4-6 unsalted matzohs
  • 1 cup Becel vegan margarine
  • 1 cup firmly packed brown sugar
  • 1 package Enjoy Life mini chocolate chips

Preparation

  1. Preheat the oven to 375°F. Line a large (or two smaller) cookie sheet completely with foil. Cover the bottom of the sheet with baking parchment — on top of the foil. This is very important since the mixture becomes sticky during baking.
  2. Line the bottom of the cookie sheet evenly with the matzohs, cutting extra pieces, as required, to fit any spaces.
  3. In a 3-quart, heavy-bottomed saucepan, combine the margarine and the brown sugar. Cook over medium heat, stirring constantly, until the mixture comes to a boil (about 2 to 4 minutes). Boil for 3 minutes, stirring constantly. Remove from the heat and pour over the matzoh, covering completely.
  4. Place the baking sheet in the oven and immediately reduce the heat to 350°. Bake for 15 minutes, checking every few minutes to make sure the mixture is not burning (if it seems to be browning too quickly, remove the pan from the oven, lower the heat to 325°, and replace the pan).
  5. Remove from the oven and sprinkle immediately with the chopped chocolate or chips. Let stand for 5 minutes, then spread the melted chocolate over the matzoh. While still warm, break into squares or shapes. Chill, still in the pan, in the freezer until set.
  6. Variation: You can also use coarsely chopped white chocolate (or a combination of white and dark), and chopped or slivered toasted almonds (sprinkled on top as the chocolate sets). You can also omit the chocolate for a caramel-alone buttercrunch.

Comment

Vegan Date Sweet Potato Spelt Muffins

Comment

Vegan Date Sweet Potato Spelt Muffins

Vegan Date Sweet Potato Spelt Muffins
from geniuskitchen.com

A yoga student actually told me about this recipe! She said it is her favourite muffin recipe and it just happened to be vegan! Every time I bake them I get asked for the recipe, so I thought it would be a good one to start off the Spring Challenge with at Luna!

The recipe below has my own personal notes, but you can find the original recipe with nutrition info here: Vegan Date Sweet Potato Spelt Muffins

Ingredients:

*Note: not all ingredients are pictured here!*

*Note: not all ingredients are pictured here!*

Wet Ingredients
- 4 very ripe bananas, mashed (don't skimp on the bananas! This makes the muffins super moist!)
- 1 cup sunflower oil (I substituted this with liquid coconut oil)

Add to wet ingredients
- 3⁄4 cup unbleached cane sugar (I used brown sugar)
- 1 cup chopped dates

Dry ingredients
- 3 cups spelt flour
- 1 3⁄4 cups oats
- 1 tablespoon baking soda
- 1 tablespoon cinnamon
- 2 cups cooked sweet potatoes, cubed

Directions:

  1. Preheat oven to 375F. (Personally, I have an oven that runs a little on the hot side... So I usually reduce the recommended temperature by 25 degrees.)
  2. Combine the wet ingredients (mashed bananas and sunflower oil) in a bowl. Add the cane sugar and chopped dates. Set aside.
  3. Combine the dry ingredients. (I like to mix the dry ingredients first: flour, baking soda, cinnamon, oats and then add the cooked sweet potato cubes and then add all the wet ingredients)
  4. Bake at 375F for about 18 minutes or until a toothpick comes out clean. (Again, since my oven is hotter than most it seems, I bake for less than the recommended time. I felt that 14 minutes worked best my last batch)
  5. It's normal for these to appear crispy and golden on top. That does not mean they are overcooked. The crispy top is part of what makes them so delicious!

- Frances

Comment

Une rencontre marquante

Comment

Une rencontre marquante

Music and mantras, the yoga of mindful singing for health, happiness, peace & prosperity

Avez-vous déjà eu l’impression qu’en un instant tout semblait s’aligner comme par enchantement, que vous étiez au bon endroit au bon moment ? C’est ce qui m’est arrivé cet automne lors d’un arrêt dans une librairie au sud de l’Inde. En fouinant les tablettes au hasard, je tombe sur le livre Music and mantras, the yoga of mindful singing for health, happiness, peace & prosperity par Girish.

Léa et Myriam

Comme j’ai toujours aimé la musique (piano), le chant et le yoga, je suis tentée d’apporter ce bouquin à la maison mais mon sac à dos étant déjà bien rempli, j’eu quelques instants d’hésitation. Léa, ma compagne de voyage m’encouragea fortement à changer d’avis et était convaincue qu’il me fallait ce livre afin de pousser ma pratique plus loin.

Girish

Revenue à la maison, je dévorai le livre en question. Il ne me fallu pas plus d’une journée pour vraiment tomber sous le charme des mots et de l’histoire de Girish. J’avais une réelle connexion avec lui sans jamais même l’avoir rencontré. Son cheminement et son parcours sur la découverte de sa voix me toucha particulièrement et me fit réfléchir sur mon propre chemin de vie. À partir de ce moment là, je savais que je devais entrer en contact avec lui d’une façon ou d’une autre. En faisant quelques recherches sur le web, j’ai découvert qu’il enseignait le chant et l’harmonium par des cours à distance en ligne. LA CHANCE ! Je pouvais à la fois le remercier de m’avoir ouvert les yeux sur cette pratique qu’est le chant mantra mais en plus, j’aurais la chance d’apprendre directement du Maître.

Musicien et chanteur connu partout à travers le monde, Girish (Glenn Cruden) a aussi été moine dans un monastère hindou durant cinq années de sa vie. Il a collaboré et joué sur plus de 100 albums de musique dont notamment Krishna Das, Wah !, Snatam Kaur. J’étais donc euphorique à l’idée de prendre des leçons avec lui. Venant tout juste d’acheter mon harmonium (merci Frances :-) ), c’était le moment idéal d’approfondir ma pratique et de bien saisir les rudiments de l’instrument.

Il accepte alors de me prendre sous son aile et je sens déjà qu’une bonne chimie s’installe entre nous, tout ça malgré la distance. Il est d’une générosité incroyable et me pousse même à enregistrer mes propres compositions. Ma voix s’améliore de jour en jour et j’ai de plus en plus confiance en moi pour chanter et jouer de l’harmonium durant mes cours chez Luna.

Comme Girish voyage et part en tournée partout à travers les États-Unis, il me demande alors si  je veux le rejoindre sur la côte Est et l’accompagner à l’harmonium durant quelques représentations. Je saute sur l’occasion pour apprendre les chansons et les harmonies des chansons de son répertoire. Ce n’est pas tous les jours que l’on vous offre une chance en or comme ça. Je me sens très privilégiée qu’il me fasse confiance de la sorte. Je fais donc le voyage avec ma mère (merci maman :-) ) jusqu’au Massachussetts, à Kripalu plus particulièrement, un centre de yoga de renommée mondiale. Je le rencontre pour la première fois dans l’après-midi afin de pratiquer en vue du spectacle du soir. Il me met en confiance malgré le fait que je n’ai jamais participé à un Kirtan de ma vie (forme de chant appel et réponse). Je rencontre ses musiciens qui sont tout aussi charmants que lui. Le spectacle se déroule à merveille devant une foule déjà conquise par ses chansons.

Durant les jours qui ont suivi, j’ai profité de l’occasion pour assister à l’un de ses ateliers de chant, et j’ai aussi pu rechanter avec lui à quelques reprises. Je me considère particulièrement choyée et fière d’avoir un professeur qui me permette de vivre cette expérience mémorable, une expérience qui je le sens marquera le reste du cours de ma vie. J’ai aussi profité de sa présence pour lui faire signer ma copie de son bouquin. Il m’a alors fait promettre de remercier mon amie Léa pour l’achat du livre.

De tout mon cœur, merci Girish, merci Léa, merci la vie !

- Myriam Turenne

Comment